

How to Install Thermal Curtains for Maximum Heat Blocking (The Air-Gap Problem)
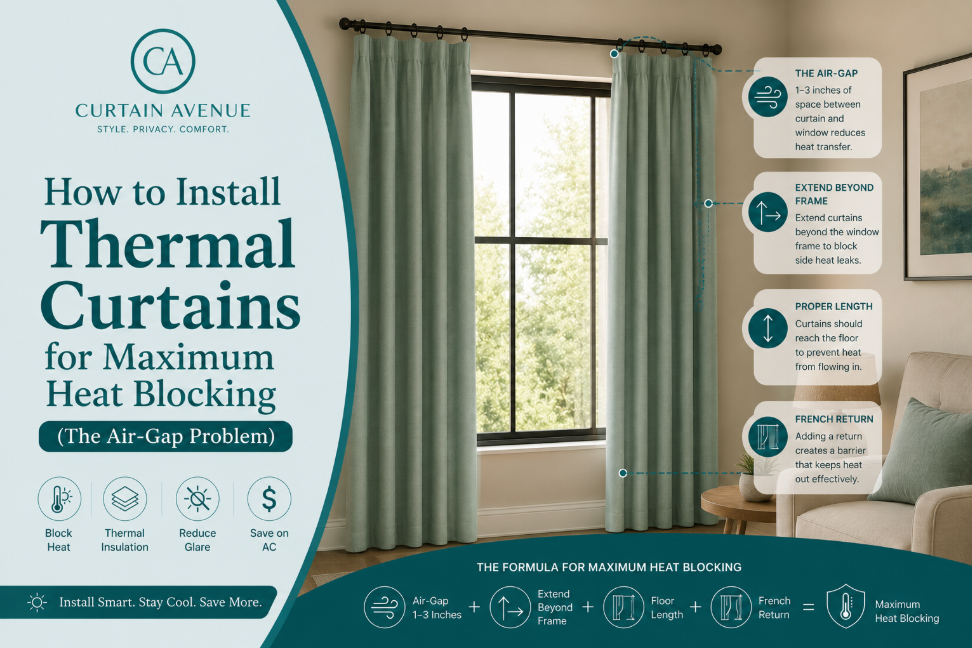
How to Install Thermal Curtains for Maximum Heat Blocking (The Air-Gap Problem)
Table of Contents
Most people buy thermal curtains, hang them the same way they’d hang any other curtain, and then wonder why the room still feels warm. They spent the money. They have the right product. But the temperature barely moved.
Here’s what nobody tells you: the curtain itself is only half the solution. The way you install it determines whether you get 20% heat reduction or 60%.
And the part that makes the biggest difference? Something so simple it gets ignored in almost every guide you’ll find online — the air gap.
This guide covers exactly how to install thermal curtains for maximum performance, from rod placement to floor length, with a specific focus on the air-gap principle that most thermal curtain installations get completely wrong.
What Thermal Curtains Actually Do (And Why Installation Matters So Much)
Before getting into the how, it helps to understand the why.
Thermal curtains work by creating a layer of still, trapped air between your window and your living space. That air acts as insulation — the same way double-pane glass works — slowing the transfer of heat through the window.
The key word is trapped. For the insulation layer to form, that air pocket needs to be sealed. If warm air (in summer) or cold air (in winter) can circulate freely around the curtain — through gaps at the sides, the top, or the bottom — the thermal barrier never fully forms.
This is the air-gap problem, and it is the number one reason thermal curtains underperform in real homes.
Even the best fabric fails if installed incorrectly — heat enters through gaps. That single sentence is worth repeating, because fixing gaps is free. It doesn’t require buying a new curtain. It only requires installing the one you have correctly.
Explore our thermal curtains
Step-by-Step: How to Install Thermal Curtains the Right Way
Step 1 — Choose the Right Rod Position (Higher and Wider Than You Think)
The most common thermal curtain mistake starts before the curtain even goes up: mounting the rod too low and too narrow.
Height: Mount your rod as close to the ceiling as possible — ideally within 2 to 4 inches of the ceiling line or crown moulding. The higher the rod, the more completely the curtain seals the wall above the window. Any exposed wall or gap between the top of the curtain and the ceiling becomes a pathway for warm air to sneak behind the fabric.
Width: Install your curtain rod so it extends about 12 inches on each side of your window. This does two things: it lets the curtain panels fully clear the glass when open (so you don’t lose natural light when you want it), and more importantly, when closed, it ensures the fabric overlaps the wall — not just the window frame — on both sides, sealing those side gaps completely.
This one adjustment alone can meaningfully improve how much heat your curtains block.
Step 2 — Use a Return Rod or Wall-Hugging Installation
This is the step most standard guides skip, and it is arguably the most impactful part of thermal curtain installation.
Even with a wide rod, there is still a gap between the back of the curtain and the wall on either side. On a standard straight rod, the panel hangs a few inches away from the wall, and that opening lets air circulate freely behind the fabric — defeating the entire purpose of the thermal lining.
The solution is a French return rod, also called a return rod or wraparound rod. A French Return rod allows the curtain to wrap all the way to the wall, eliminating the side gap entirely. Instead of the rod ending in space, it angles back and connects to the wall at both ends, so the curtain follows that same path and sits flush against the wall surface.
If a return rod isn’t an option, use magnetic curtain seal tape or heavy-duty hook-and-loop tape along the wall edge to press the curtain flat against the wall surface when closed. It isn’t as clean-looking, but it works.
Step 3 — Get the Length Right (Floor-Length Is Non-Negotiable)
Short curtains — ones that end at the windowsill or below the sill but above the floor — are a thermal disaster.
The gap at the bottom of a short curtain acts like an open vent. Warm air in summer and cold air in winter flows freely underneath, disrupting the insulation pocket the curtain is trying to create.
Floor-length drapery, where the panels float above or just graze the floor, more effectively traps hot air at your window. For thermal curtains specifically, you want the fabric to just skim the floor — within half an inch — so there is no open channel at the base.
If you want even better performance, especially in winter, allow the curtain to puddle slightly — an inch or two of extra length that rests on the floor. This creates a near-perfect seal at the bottom.
Step 4 — Understand the Air Gap You Are Creating (and Protect It)
This is the part of thermal curtain installation that nobody explains clearly.
When you hang your curtains correctly — high rod, wide rod with returns, floor-length panels — you create an enclosed air pocket between the glass and the back of the fabric. That still air is what does the insulating work. Thermal curtains create an air pocket between the window and the room, acting as an additional layer of insulation — similar in principle to what double-pane glass achieves structurally.
The air gap should be roughly 1 to 3 inches deep. Too shallow (curtain pressed directly against the glass) and the fabric conducts heat straight through without the buffer. Too wide (curtain hanging far out from the window) and the air circulates rather than sitting still.
This is why the curtain should hang close to the wall — not draped loosely into the centre of the room. The wall forms the back of the insulation chamber. The curtain forms the front. The still air between them does the work.
Step 5 — Seal the Centre Gap on Two-Panel Installations
If you are using two panels that meet in the middle, the join between them is another common failure point.
Panels that overlap at the centre by at least 3 to 4 inches prevent light and air from leaking through. If your panels only meet edge to edge — or worse, leave a gap — you lose insulation and the fabric reads as two separate elements rather than a continuous barrier.
Use curtain clips, magnetic curtain closures, or simply order panels with enough width to create generous overlap. A single wide panel per window, rather than two narrower ones, eliminates this problem entirely.
The 5 Thermal Curtain Mistakes That Kill Performance
Even well-chosen thermal curtains underperform when these installation errors are present. These are the most common thermal curtain mistakes to avoid.
Mistake 1 — Hanging the Rod Inside the Window Frame
Curtains mounted inside the recess of a window frame leave the wall surrounding the window completely exposed. Heat moves around the curtain rather than being blocked by it. Always mount outside the frame, on the wall itself.
Mistake 2 — Choosing the Wrong Fabric (Then Blaming the Install)
Installation matters, but so does the product. If the fabric is not tightly woven, the warmth will pass through it and the air will not be trapped. Hold the fabric up to light before buying — if you can see daylight through it, heat will pass through it. Dense, tightly woven polyester with a thermal or acrylic lining is the benchmark for effective performance.
Mistake 3 — Dark Lining Facing the Glass
For summer heat blocking, the colour of the lining facing the window matters. By using a custom curtain with a white backing facing the street, you reflect the sunlight away before it enters the glass. Dark linings absorb solar energy and radiate it back into the room. White or metallic linings reflect it outward. For maximum summer performance, choose a light-coloured or reflective backing.
Mistake 4 — Leaving Gaps at the Top
A rod that sits 6 or 8 inches below the ceiling leaves an open triangle of wall at the top corners where the rod bracket mounts. Hot air rises, finds that gap, and flows directly behind the curtain. The fix is simple: mount higher, or use a valance or top treatment to cover that space.
Mistake 5 — Not Using the Curtains
This one sounds obvious, but it deserves saying: thermal curtains only work when they are closed during peak heat hours. In summer, that means closing south and west-facing windows from around 10 AM until the sun moves off them. Proper installation — ensuring the curtain covers the entire window frame — greatly enhances performance. But no installation fixes a curtain that stays open all day.
Room-by-Room Thermal Curtain Installation Guide
Bedrooms: Prioritise a complete seal. Use a return rod, floor-length panels, and generous overlap at the centre. Bedrooms often face east or west — directions that get direct sun for long stretches — making proper thermal installation here the highest-impact change you can make.
Living Rooms: Large windows and open layouts make gaps especially damaging. Extend the rod the full 12 inches either side and use two layers if possible — a sheer behind a thermal panel. The sheer provides light during the day; the thermal panel seals the window at night or during peak sun hours.
Home Offices: The problem here is usually glare on screens compounded by heat buildup. Install thermal curtains on the side of the window that gets direct afternoon sun, and opt for a medium-density fabric that reduces heat and glare without making the workspace feel dark.
South and West-Facing Windows: These are the highest priority in any home. South and west-facing windows need thermal protection more than anything else. A properly installed thermal curtain on a south-facing window in summer does more to reduce room temperature than adding a second curtain to a north-facing window.
How to Measure for Thermal Curtains (Getting Dimensions Right Before You Buy)
Getting the measurement wrong is one of the most expensive thermal curtain mistakes you can make. Custom curtains ordered to incorrect dimensions waste money and perform poorly.
Width: Measure the full width of the wall space your rod will cover — not just the window. Add the 12-inch extensions either side, then multiply by 1.5 to 2 for fabric fullness. A flat, under-fullness panel has fewer folds and less insulating air trapped in the fabric itself.
Length: Measure from the top of the rod to the floor, then add half an inch to one inch for the floor skim. If you want a puddle effect for better bottom sealing, add 2 to 3 inches.
Panel count: For a 60-inch-wide window with 12-inch extensions either side, your rod covers 84 inches. With 2x fullness, you need 168 inches of fabric — typically two panels of 84 inches each, or four panels of 42 inches each.
Final Checklist Before You Hang
Use this before installing any thermal curtain:
- Rod mounted within 4 inches of the ceiling ✓
- Rod extends 10 to 12 inches beyond the window frame on each side ✓
- Return rod used to eliminate side gaps (or edge tape applied as alternative) ✓
- Panels are floor-length — skimming or just touching the floor ✓
- Centre overlap of at least 3 to 4 inches where panels meet ✓
- Lining is white, cream, or reflective (not dark) ✓
- Fabric is dense enough that little or no light passes through when held up ✓
When all seven of these are true, you have created the conditions for the air-gap insulation layer to do its job. The curtain stops being decoration and starts being a functioning part of your home’s thermal envelope.
Ready to Install Properly?
The difference between a thermal curtain that barely works and one that genuinely changes your room temperature often comes down to three things: rod height, side sealing, and floor length. None of them cost extra. They only require knowing about them.
If you are choosing thermal curtains for a home in New York — where south and west-facing apartments deal with brutal afternoon heat from June through September — getting these details right makes a measurable, daily difference.
Explore custom thermal curtains at Curtain Avenue — made to your exact dimensions, with the lining, fullness, and length that actually performs.
Free swatches ship today at curtainavenue.com
You May Also Like

How to Cover a Sliding Glass Door: Curtains vs. Blinds vs. Shades
September 25, 2026
Factor Curtains Blinds Shades Light control Good in full draw; layering with sheers gives fine control Best — tilt slats

French Door Curtains: Ideas, Fabrics & How to Choose
September 23, 2026
Doors & Beyond — Curtains on French Doors: Ideas by Room, Style, and Mounting Method
Need Help in custom window treatments ?
Our design experts are here to help you find the perfect fit for your home.

Expert Advice

Custom Made